
Creating Edition Prints & Unique Multiples
In this article...
• Editions overview
• Creating the Edition Master template
• Viewing editions
• Creating prints within an edition
• Creating 'Unique Multiples' and batch variations
Editions overview
Editions consist of:
- an edition master template: the Edition Master is not an artwork; it is used only as a template for prints created within the edition - when all the prints have been created, it is no longer accessible.
- individual edition works/prints based on the edition master template.
You can:
- create limited editions up to 2000 in size (edition sizes are strictly enforced once a print is created within an edition, even if that print has not been Certified).
- create variations for individual prints or subsets of an edition e.g. unique multiples, hand-finished prints etc.
- support print on demand workflows (i.e. creating prints one by one, or in small batches)
- specify APs and PPs
Open editions and edition sizes greater than 2000 are not directly supported. Contact support@tagsmart.com for assistance if required.
Anyone can create an Edition Master template, but to create specific prints/works within an edition requires the permission ('authority' - see ' All about authorities' for more information) for that artist. If you want to create an edition print because as a collector you own a work within the edition, you can apply for retrospective certification. Email the Registrar at registrar@tagsmart.com.
Creating and Certifying Editions - In Brief
There are 3 steps to creating prints. Each is explained in more detail below. The steps are:
- Create a template - the Edition Master - that will be used to generate prints within the edition. For instructions, see here.
- Once you've created and saved a template, the edition will show on the Artworks screen. You can access the template and create prints by clicking on 'View Edition' to show the edition list. For examples, see here.
- On the Artworks Screen, click on 'View Edition' and then on 'Create Prints/Works'. For instructions, see here.
Creating the Edition Master template
For help on creating works in general, including Edition Masters, see the article ' Quick Start - Add a new artwork'.
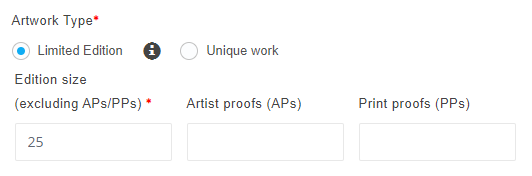
To create a new Edition Master template, click ‘+ ADD NEW ARTWORK’ on the main Artworks screen, then select Limited Edition as the Artwork Type.
Enter the size of the edition - the number of prints to be produced, excluding any artist proofs (APs) and printer proofs (PPs).
Optionally specify the number of APs and/or PPs. If you are planning to release unlimited APs or PPs, or do not know how many you will be creating or have been created, contact the Registrar at registrar@tagsmart.com for assistance.
Click SAVE and return to the Artworks screen.
Viewing Editions - the Edition List screen
Once the Edition Master has been created, the Edition artwork panel is shown on the main Artworks screen.

The example shows for comparison a Unique Work artwork panel (left, identified by the green type indicator: 'Unique Work') and an Edition Master panel on the right (the blue type indicator also tells you the edition size). Click on the 'View Edition' button to show the Edition List screen.
The Edition List screen
The Edition List screen is accessed by clicking on 'View Edition' on the edition's artwork panel on the Artworks screen. It lists the prints created so far in the edition and provides controls (subject to user/account permissions) for the editing, viewing and DNA tagging of individual prints.
If this is a new Edition Master for which no prints/works have been created, you will see the following screen with the message 'No works in this edition have been verified.':

Where prints have already been created, you will see an edition list like this:

'Verification' is the process by which you:
- verify the information in the Edition Master...
- ...then create prints and works within that edition.
This process is described below.
Creating individual prints within the edition
There are three simple steps to creating an edition print.
1. Check the edition master template - from the Artworks screen, click on 'View Edition' and then, on the Edition List screen as shown above, click on Edit Master. The Edition Master edit screen will display; amend/add any information if required, not forgetting to SAVE the work if you make changes.
We strongly advise that you check the current information stored in the Edition Master template before proceeding. This is because when you create an individual print/work within an edition, the print will inherit the information currently saved in the Edition Master template. Edition numbers, signature information, title, artist and creation date cannot be changed after the print is created.
2. Click on 'Create Prints/Works [from this edition]'. You can access this control either from edit screen or from the edition list screen. The control will not display if all prints have already been created. Clicking on 'Create Prints/Works...' will display the 'Confirm Information' screen as a final check. If you spot something you want to change, you can click on 'Edit Artwork Information' to edit the Edition Master template.
Provenance and publication confirmation requests may also be presented at this time, depending on your user/account permissions (authority).

3. Choose the print number(s) to create - after confirmations, the screen will display the 'Create print(s)/work(s)' window. We strongly recommend that you ONLY create the prints/works that you need at the time (for example, to issue a Certificate when you've sold a print).
This allows you the maximum flexibility to adjust edition print content (by editing the Edition Master) for subsequent prints, including the creation of special prints and 'unique multiples' (see next section).
When creating individual prints, you can enter multiple print numbers separated by a comma.
Click on 'Confirm and Proceed' to create the prints. The system will warn you if you attempt to create prints that have already been created.
You can then view the prints you've created on the Edition List screen as shown above.
HINT: As a general rule, you only need to create a print within an edition if you wish to issue a Certificate for it. However, you might want to create prints as a means of tracking works that have been, for example, physically printed within an edition ('print on demand'). You can then see at a glance (see Viewing Editions, above) which works have already been produced/printed and can therefore be sold/Certified.
Creating unique edition prints and batch variations
You may want to create prints that are within the same edition but have attributes which differ from some or all of the other prints in the edition. For example:
- special attributes (e.g. a colour change, hand-finishing etc)
- prints from the same edition but in individually different dimensions
- a particular observation or statement (e.g. ‘Printed for the Wolff Exhibition, London, 2021)
You can do this in one of two ways: the method you choose depends on whether you're creating:
- 'Unique Edition Prints' - a single print from the same edition but with a unique variation
- for example, you hand-finish a set of prints where each one is uniquely different e.g. with different gold leaf patterns or...
- 'Batch Variations' - a batch of prints, where each print in the batch is identical but different to prints in other batches; for example:
- you produce an edition of ten, comprising of five identical blue prints and five identical red ones
- you produce five prints for a specific exhibition and you want their Certificates to read 'Exhibited at the Woolwich Art Fair 2021'
Creating Unique Edition Prints
First, create the print or prints you require in the normal way (see above) - don't forget to check the Edition Master template first. Do NOT issue Certificates for the prints until you've completed this process as prints cannot be varied after Certification.

On the Artworks screen, click on VIEW EDITION and then, on the Edition List screen, click on the edit icon (a pen and paper - see arrowed element in image) beside the appropriate print.
You will then be presented with the edit screen for that individual print. You can delete the Certificate image and add a new one, change the dimensions, enter new statements etc for this individual print.
SAVE the print. Then, if needed, you can issue a Certificate from the Edition List screen.
A reminder:
- Do NOT issue Certificates for the prints until you've completed this process as prints cannot be varied after Certification
- You cannot alter the artist, title, category, edition size or edition date for individual prints: these are set by the Edition Master and, once the first print in the edition has been created, are written in stone!
Creating Batch Variations
If you want to create more than one print with the same variation, it's impractical to use the above approach. Instead, you can edit the Edition Master template to include the variations for a whole batch of prints. To do this:
- On the Artworks page, click on 'View Edition'.
- On the Edition List, click on Edit Master (this control will not be visible if all prints in the edition have already been created).
- Change the Edition Master information as required for this batch of prints: you can change everything except the core data regarding title, artist, edition size etc.
- SAVE the template and click on CREATE PRINTS/WORKS IN THIS EDITION
Important! Once ALL prints have been created, the Edition Master is retired and is no longer editable or accessible. Information about each print is of course still held in that print's artwork record.