
Add a new artwork
In this article...
• Getting started
• Add new artwork
- Enter the artist, title and category
- Edition or unique?
- Dates and signatures
- Uploading an image
- Statements and observations
• SAVE-ing your work
• Deleting a work
Getting Started
When you log in to an account for the first time, it may already have one or more artworks visible. However, if it's a new artist or gallery account, you'll see this:

Whether or not there are works visible, you can create a new artwork or edition master template (used for generating edition prints) at any time. Just click on 'Add New Artwork' to display the Add new artwork screen.
Add new artwork
On the Artworks screen, click on the 'ADD NEW ARTWORK' button to display the Add new artwork screen.

This Help article covers the data entered in the Certificate information tab, which contains mandatory information for all works. For information on the Additional Detail, Online Images, and Private data tabs see the article 'Adding more information'.
Enter the artist, title and category

The artist drop-down displays those artists available for attribution to the works you create. To attribute a work, select the artist from the dropdown list.
- If your account has multiple artists in the dropdown, it may take a moment or two to load the artist list.
- Your user profile has permission ('authority') to issue Certificates for artists marked with an asterisk * and listed in the dropdown under 'My Artists'. For new accounts, you will normally have permission to request Certificates for any artist shown in the list. For more information, see 'All About Authorities'
- Once you SAVE a work, the attribution cannot be changed: if you've made a mistake in the attribution, delete the work (see Deleting a work, below) or contact support@tagsmart.com.
- If you're an agent, you can add and manage additional artist accounts and switch between them seamlessly while logged in – ask support@tagsmart.com to set this up for you.
Title and Category are self-explanatory. There is no length restriction on titles but for practical purposes and printing on Certificates very lengthy titles should be avoided. If the Category you require isn't shown, contact support@tagsmart.com.
Setting the artwork type
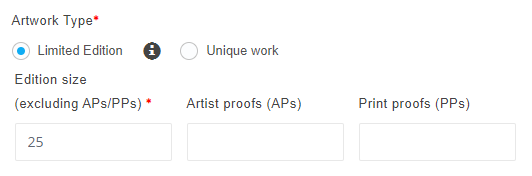
You can create unique works and limited editions. Select 'Unique Work' if you are creating a single work. Select 'Limited Edition' if you are creating a new edition.
When you create a new work and select 'Limited Edition', you are creating the edition master. Creating the actual prints within an edition is a separate step (see Creating Edition Prints and Unique Multiples) - and is only possible if you have the right permissions ('authority') for the artist in question. The edition master then serves as the default record for each print created within that edition.
If you're creating a Limited Edition, you'll need to enter the edition size - the number of prints EXCLUDING proofs - and the number (if any) of artist and printer proofs. If there are no proofs, you can leave the entry blank - you don't have to enter a zero. Edition sizes are limited 2000 prints.
Edition size and proof numbers can be changed after SAVEing the edition master, but cannot be changed once one or more prints have been created within the edition.
The Tagsmart Platform includes support for print-on-demand as well as hand-finishing/unique variations within an edition ('unique multiples'). For more information about managing editions and creating prints, see Creating Edition Prints and Unique Multiples.
Artwork creation date
You can choose what sort of date you're entering using the Date dropdown. Enter the date the work was completed:
- if an edition, the date refers to the completion of the work from which edition prints will be created
- if a photograph, the date refers to the date the photograph was taken (not the print date)
Using the date type and calendar tool

You can choose the type of date you want to assign for the work from the dropdown.
Once you've chosen the date type, click on the date input panel to display the calendar widget. The widget displays the current month when first launched (see image 1 below). To display all months in the year, click on the Month/Year at the top of the widget and then on the month you desire (image 2 below). To display multiple years - useful for setting dates years in the past - click again on the Year at the top of the widget and then on the year you desire (image 3 below). You can step through the date range displayed using the cursors at the top left/right of the widget.

Uploading an image
Click on 'Insert Certificate Image' in the image panel headed 'Certificate Image' to upload an image of your artwork. This is the image that will be shown on the Certificate: it should show the entire work and be of the best quality you can acquire. If using a smartphone, take the picture straight on (not from an angle), without using flash and without shadows cast on the work.
You can upload any JPG, JPEG or PNG file. The image must be at least 1000px in one dimension and at least 500px in the other. The Tagsmart Platform has a powerful set of features relating to image management to reduce the risk of copyright infringement: see the articles Image management and watermarks and Image slideshows for more information.
Dimensions and Media
Choose the units of measurement required from the dropdown. Height is optional for flatworks. The dimensions should be of the physical work (not including the frame, if framed).
The media description is limited to 65 characters due to space restrictions on Certificates. You can enter additional media information if required in the 'Additional information about the work' panel below.
Entering an Artist Statement and Additional Observations
- Artist statement: This is normally a general statement about the artist's practise, with optional reference to the specific work
- Additional information about this work: This is normally used to supply specific information about this particular work - for example, hand finishing effects, materials, exhibitions and commission information.
There is currently no length restriction on these fields, but a combined length of over 175 words (about 800 characters) for both these fields will necessitate cutting or layout changes on the printed Certificate, where space is limited.
SAVEing your work
You must enter at least the artist, title, and category before you can SAVE a work. Once you've saved a work, subject to the authority you have for the artist (see All About Authorities):
- for a unique work, you can issue a Certificate; you will be prompted to fill in any information missing from the Certificate information tab
- for an edition, you can create individual prints within that edition, for which you can issue Certificates.
See Issuing A Certificate to issue a Certificate.
IMPORTANT: Certified works - and editions which have had one or more prints created - cannot be deleted, so don't issue a Certificate until you're sure the SAVEd information is correct. See 'Deleting a work' below...
Deleting a work
To delete a work, locate the artwork's panel on the Artworks page. Two examples are shown below. Click on the 'Trash' icon at the bottom of the panel.
If no 'Trash' icon is shown, user deletion of the artwork is not permitted. You can delete any unique work provided it has not been Certified. An edition master can be deleted if no prints have been created within that edition. If you need to delete a Certified work or an edition that has declared prints, contact support@tagsmart.com.
